SYSTEM DESCRIPTION
1.1 Object
1.2 Range
1.3 Funcionality
SYSTEM MAP
2.1 Logic Model
2.2 Navegation
SUBSYSTEMS DESCRIPTION
3.1 Overview Subsystem
Overview Screen
3.2 Datasets Subsystem
Datasets Screen
Integrate New Dataset
Error message
Contextual aids
3.3 Data Request Subsystem
Data Request Screen
New Data Request
Error message
3.4 Request Evaluation Subsystem
Request Evaluation Screen
Error message
3.5 Profile Subsystem
Profile Screen
FAQ
SYSTEM DESCRIPTION
1.1 Object
The purpose of this document is to provide the necessary instructions so that a user can easily use the GFBI DMS application, understand the policies applied to the data and the necessary flows for the transfer of this data.
1.2 Range
Description of the scope of this document:
- To inform end users of the characteristics and ways of operating the system.
- Provide the user with the information necessary to use the GFBI DMS.
- Facilitate the registration of requests for use of the service and fault reports.
- Know how to use a system, through a detailed description and illustrated through options.
1.3 Funcionality
Brief description of the functionality of the system for users of the manual. Through this application, any registered user can:
- Contribute new tree-level data to the GFBI global database.
- Request forest data at the parcel level from around the world for a specific research purpose.
- Manage the response to requests about your data.
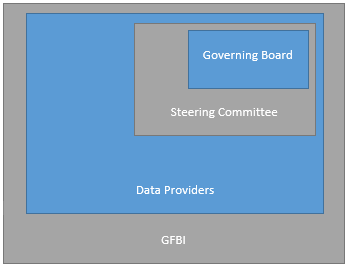
- Data Providers: All GFBI members who have contributed data.
- Steering Committee: They are the members with the capacity to decide on the acceptance of requests
- Governing Board: They are the members with the capacity to evaluate discrepancies of the steering committee.
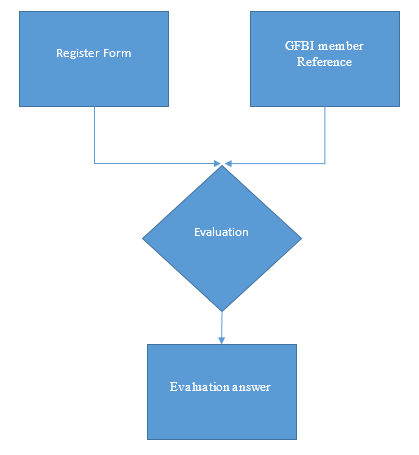
Protocol to be a member of the GFBI
To become a member, you must send your data, with this form, including the reference of a GFBI member. The request will be evaluated and, if positive, an email will be sent with the necessary data to access the GFBI DMS.
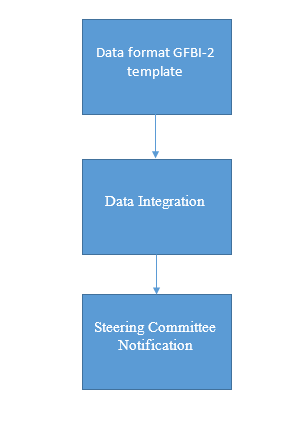
Add New Dataset Process Flows
A good practice to be able to add new data sets is to use the GFBI-2 template for the structure of your data, in this way the integration process will be much easier. The data integration process requires a series of specific information for its cataloguing and registration, as well as checks on possible errors in the data. Once the integration process has been successfully completed, the members of the steering committee will be informed by mail.
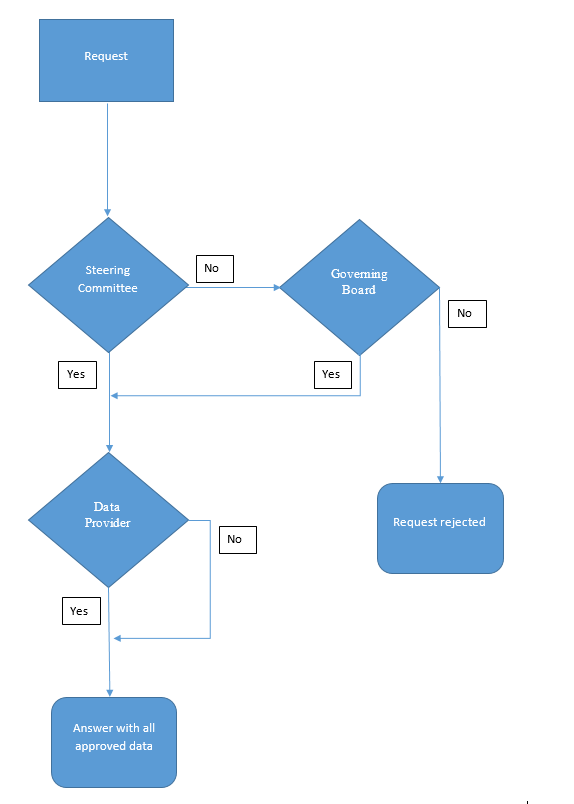
Data Request Process Flows
- When a data request occurs, all members of the Steering Committee are informed to evaluate the request, the maximum established time for this process is 15 days. According to the decisions made there are two possible ways.
- All members of the steering committee approve the request.
- One or more members of the steering committee reject the request.
In this case, the request will go to the data providers involved (step 2).
In this case, the petition will go to the governing board, they review the discrepancy and can definitively reject the petition (step 4) or approve it (step 2).
- The request reaches the data providers.
- At the end of this process, an email is sent to the data requestor, informing of the data available to him and the way in which he can access them.
- If the request is rejected, an email is sent to the data requestor informing him of the decision and the request is closed.
The request must be answered by all providers before giving access to the data, for this process there is a maximum established time of 21 days. After that time an automatic response occurs depending on the policy applied on their data. (step 3)
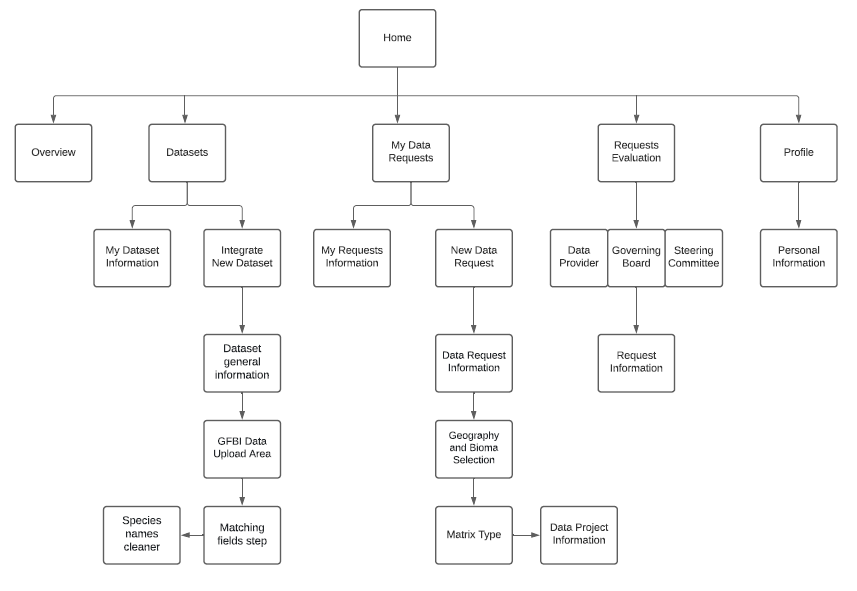
2.2 Navegation
At this point, the navigation through a window graph will be described. This diagram represents the windows system, the navigations between them are represented by arrows. The most significant paths have been represented.
Datasets
Datasets overview
Integrated New Datasets
Data Requests
My Request Information
New Data Requests
Requests Evaluation
Profile
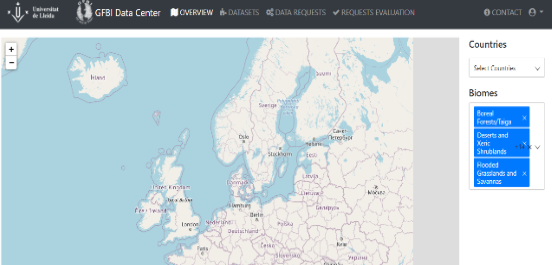
3.1 Overview Subsystem
This subsystem shows the information, on a map, of the plots that we can access from the platform.
Overview Screen
When accessing this page, we find the option to show all the plots or only those that we want to select.
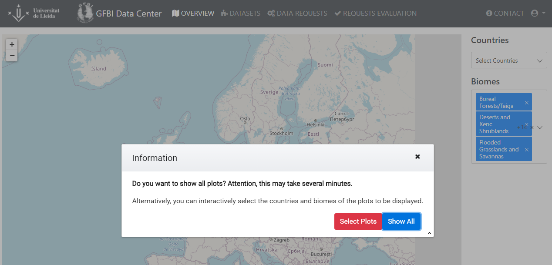
If we choose to make a selection of plots, it can be filtered by country and by type of biome.
3.2 Datasets subsystem
This subsystem allows the revision of the data sets that have been entered and also to add new data sets.
Datasets Screen
My Datasets Information
When accessing the Datasets section, we will have a summarized view of the datasets that we have integrated.
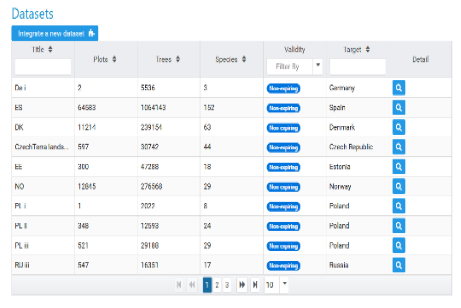
You can filter the datasets by country and also by the type of validation.
We can also see the expanded information of the datasets by clicking on the magnifying glass.
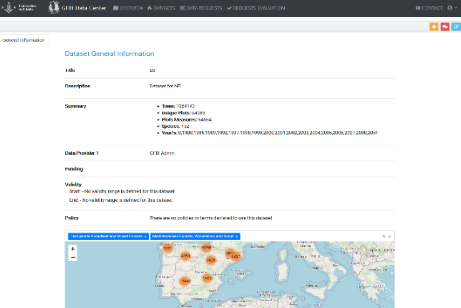
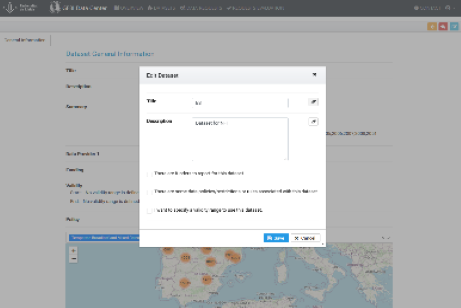
From this page, we can also modify some data and suggest modifications or errors in them, using the control buttons located in the upper right corner. The edit button is blue, the one for suggestions is red.
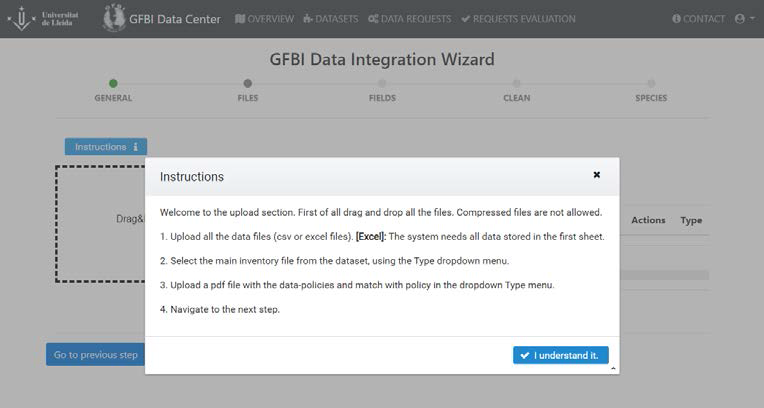
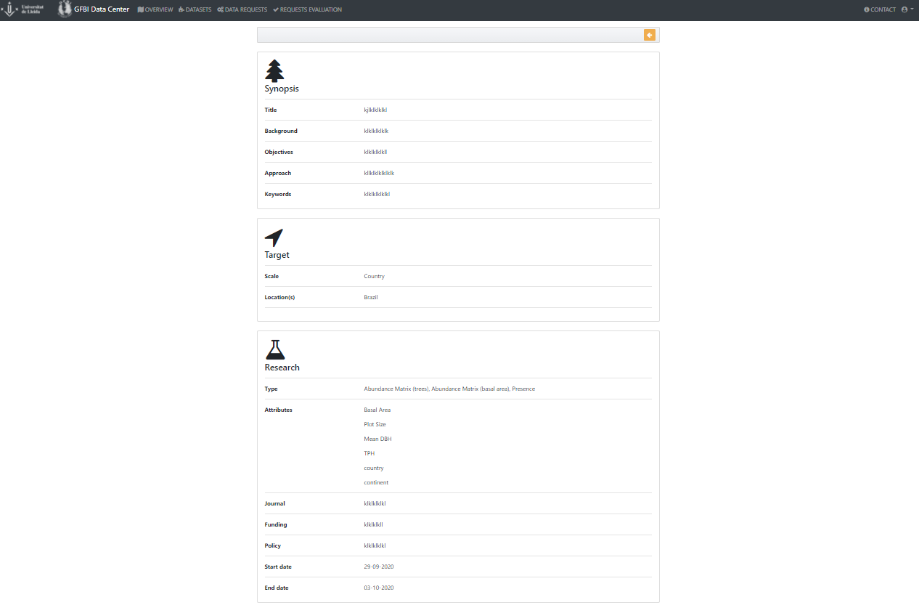
Integrate new dataset
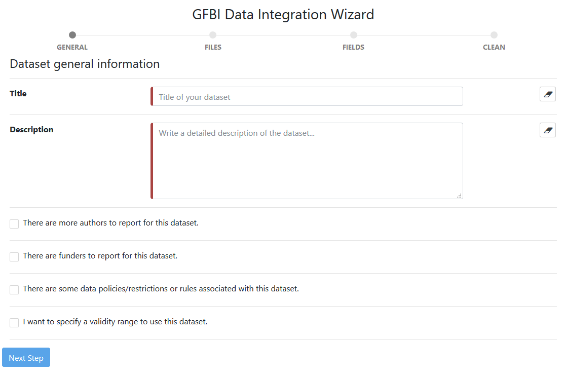
To integrate a new dataset, the subsystem must be accessed through the button “Integrate a new dataset”.

The first page is used to describe the data set, the providers, the associated restrictions or policies, and the length of time the data can be used.
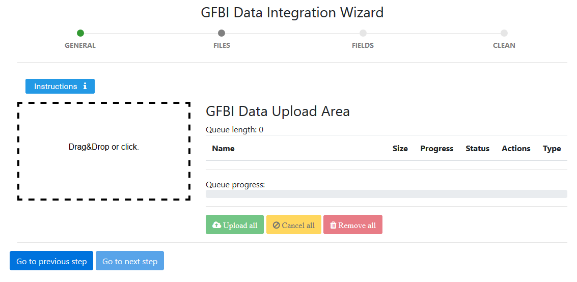
The next page is used to upload the data to the platform, you can also include specific documents for the transfer of that data, such as additional policies. The type of file to be uploaded must be specified in the “Type” section.
The data files can be excel or csv, these must comply with a certain structure and format to guarantee a standard and the homogeneity of the information. A template can be found at the following link.
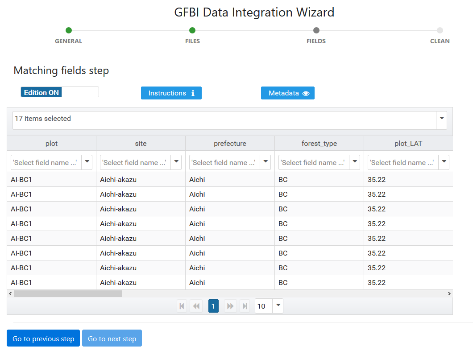
On the next page, the platform shows in a table the set of data that has been imported, for the integration to be done correctly they must match the proposed data types.
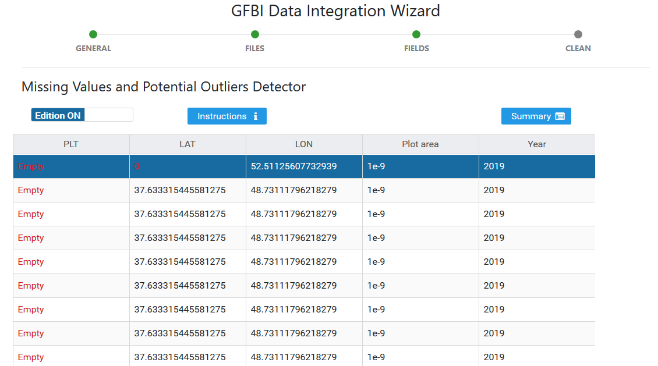
To finish the process, the edit button must be deactivated, in this step the system checks for possible outliers. In the case of finding any, it will report the problem, but you can continue the process, without modifying, if you deactivate the edit button again.

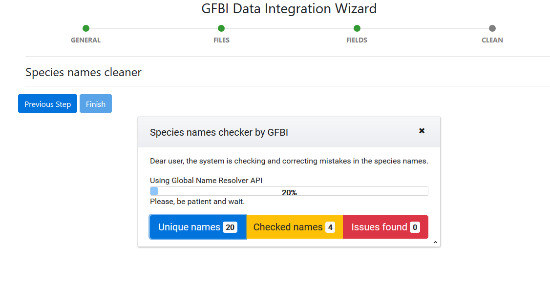
In the next page, possible errors related to the name of the species are checked and corrected.
Successful matches are marked in green and those to be reviewed are marked in other colours.
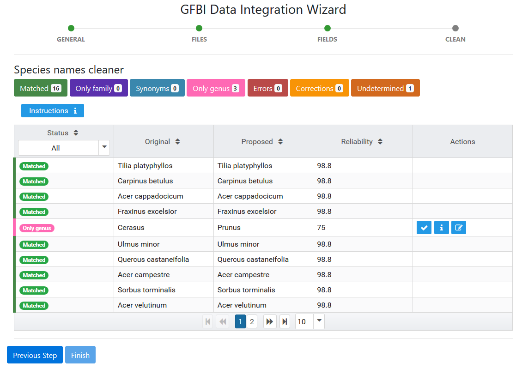
Before the data integration process can be completed, all species-related problems must be resolved.
To do this, you must click on the button corresponding to each type of error and correct them. The correction can be carried out one by one or all at once using the “Accept all shown” button.

When you finish reviewing the species data and there are no errors, the “Finish” button will be activated. Clicking on that button will end the data request process.
Warning
In the case of finding an outlier, it will report the problem by activating the “Edit” button again, but if the data providers considers that the data is correct, the data provider can continue the process, without modifying anything, by deactivating the “Edit” button again.
Contextual aids
In all the pages of the data integration process, you will find a button “Instruction i” that will show you information about the process.
3.3 Data Request Evaluation
This subsystem allows the review of data requests that have been requested and also to make new requests.
Data Request Evaluation Screen
My Request Information
When the “Data Requests” section is accessed, a summary view of all the data requests that have been requested appears.
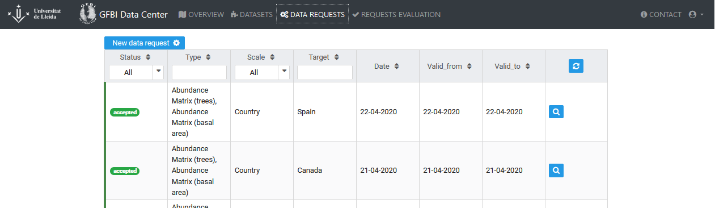
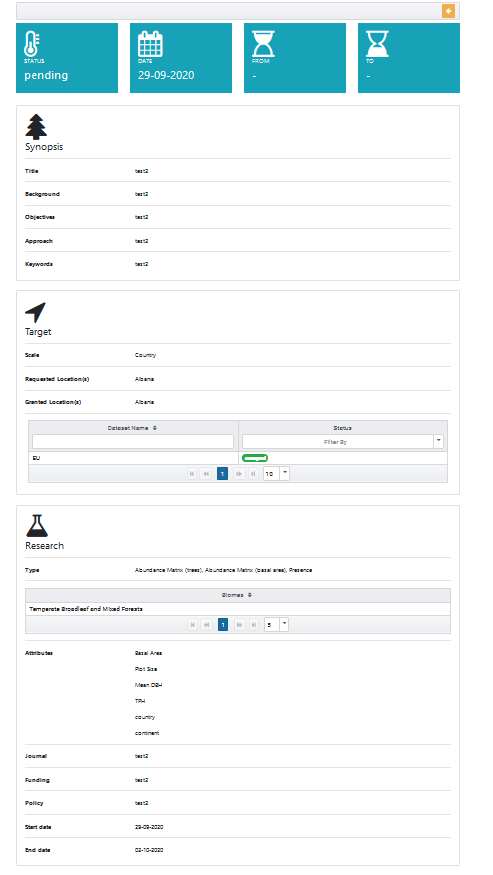
We can also see the expanded information of the requests by clicking on the magnifying glass.
New Data Requests
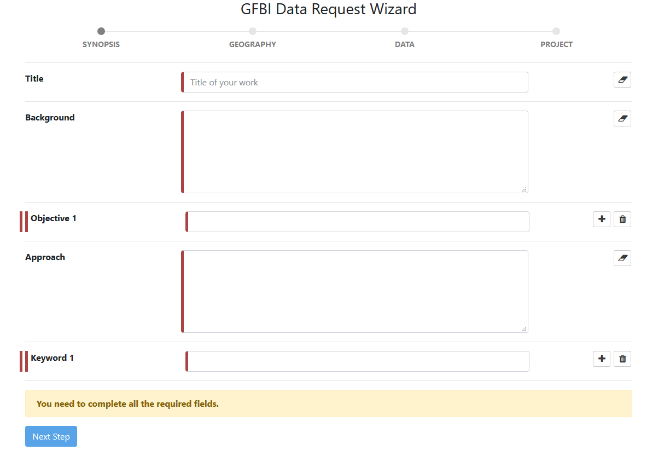
To make a new data request, the subsystem must be accessed through the “New Data Request” button.
On the first page, you request a description of the project for which you need the data.

On the next page it asks you to select the type of array and it will show you a short description of the attributes that will be displayed.
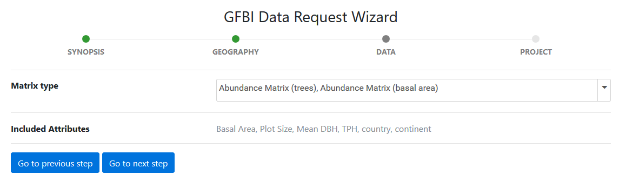
In the last step, you must inform about the use of the requested data, such as: the time the data will need, the objectives of the project for which you request it and the collaborators in the project.
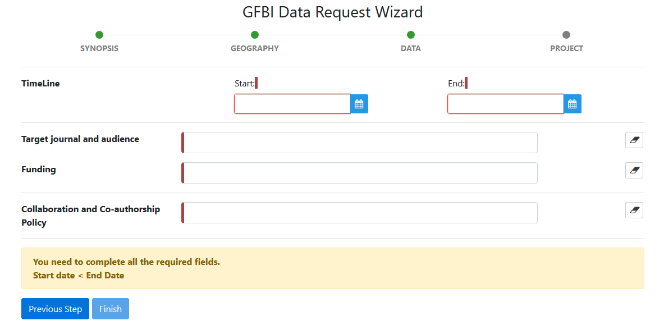
When you finish entering the required data, the “Finish” button will be activated. Clicking on that button will end the data request process.
Warning
All the options marked in red are an essential requirement.
For a correct evaluation it is recommended to make a description as detailed as possible of the project and its objectives.
3.4 Request Evaluation subsystem
This subsystem allows the evaluation of the data requests that have been made, as well as the review of their status and access to the requested data if they have accepted the request.
Request Evaluation Screen
All requests have to be evaluated.
The first evaluation is carried out by the steering committee, which is in charge of evaluating the suitability of the data request for the exposed project. If the evaluation is affirmative, each data provider, affected by the request, must evaluate the request for their own data.
All requests are notified to the different members of the GFBI by email, access to the evaluations can be done from the link in the email or by accessing the “request Evaluation” section.
In this section you can switch between the different roles, if you have more than one, by using the drop-down at the top of the grid.
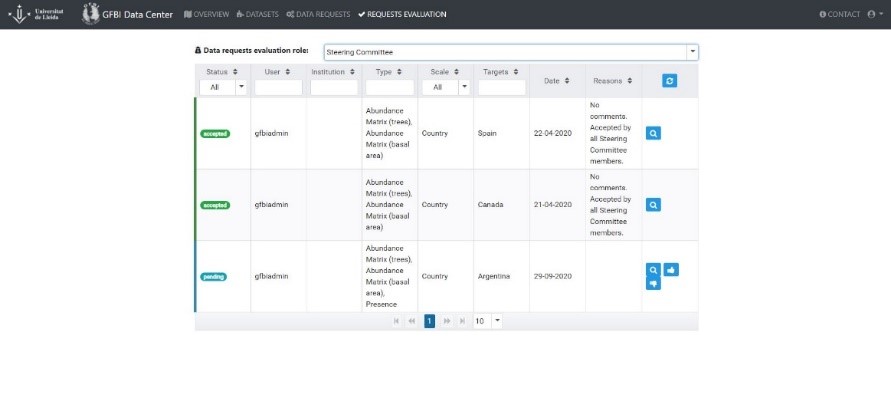
Description of the actions that can be carried out:
![]() Accept the request
Accept the request
![]() Reject the request
Reject the request
![]() Review the complete details of the request
Review the complete details of the request
The acceptance of the requests does not involve any other action, on the contrary, rejecting the request must be done by justification, for this a pop-up will open in which you can describe the problem for which you are rejecting it.
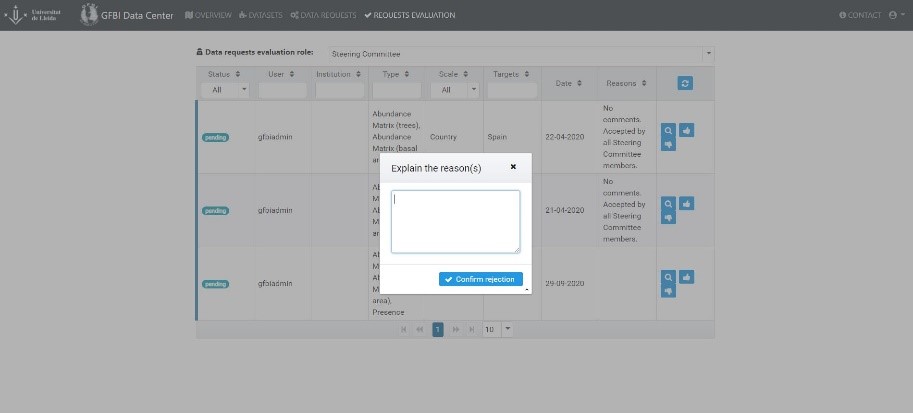
Using the magnifying glass, you will be able to review the request data in more detail.
Warning
In case there are multiple roles within the GFBI, data provider, steering committee, etc., you can access the requests for each role through the drop-down located at the top of the grid.
3.5 Profile Subsystem
This subsystem allows the editing of some data that GFBI has about the user. In this section you can also review and approve the “Silent Negative” policy that was implemented for the transfer of data.
Profile Screen
To access this section, you must click on the user’s image, located in the upper right corner and later in the menu displayed in the “Profile” section.

Once inside, you can review the personal data shown in the boxes, you can also modify the access password in the security section. In the preferences section you will find the information regarding the “Silent Negative” policy and accept it or not.
Finally, to save the modifications, you must click the “Save Changes” button.

FAQ
-
How long does it take to obtain the data of the Data Request?
- It must be taken into account that the process of accepting a petition has two phases:
The petition approval phase is evaluated by the steering committee; a 15-day response policy has been established data providers phase, providers can accept or refuse to include their data for each project, a response policy of 21 days has been established. -
What kind of data can be integrated into the GFBI DMS?
- The GFBI DMS has been prepared to be able to integrate first level data, that is, data at the tree level.
-
Once the data has been integrated can I modify it?
- We can only modify some parts such as: the title, the description, the funders or the data transfer time. If you need to make any more profound modifications, on the same Dataset revision page you can find a button to send the notification to the GFBI DC.
-
How can I access the GFBI DMS?
- In order to access the GFBI DMS you must be a member of the GFBI.
-
How can I become a member of the GFBI?
- To become a member of the GFBI, you must complete the form that you will find in the following link, in addition, in the petition you must include the reference of an active member of the GFBI, so that you can verify the identity.
-
What is the GFBI and what does it do?
- For more information about the Global Forest Biodiversity Initiative, you can consult our web.